
WordPress is the most popular Content Management System (CMS). Though there are CMS platforms like Drupal and Joomla, those do not have commercial plugins and Themes comparable to WordPress eco system. However WordPress hosting is costly as the Hosting Providers charge based on monthly page views. Some hosting providers do not offer good site performance. So, it is a usual feeling for website owners to switch to another hosting providers. This tutorial teaches you how to migrate your existing WordPress site from one hosting server to another hosting server. With just 7$ you can migrate your wordpress site with Jetpack Plugin one month subscription.
Migrate WordPress Site from One Host to Another
There are various ways of migrating or transferring a WordPress site to another server.
- Manual Tranfer or Migration
- Using a WordPress Migration Plugin
- Using a dedicated target Hosting Provider WordPress Plugin
- Using a WordPress Jetpack Plugin with Backup, Security and Spam Protection
1. Manual WordPress Tranfer or Migration
Manual WordPress Transer or Migration requires some basic knowledge on MySQL and FTP or SFTP access with FilZilla.
Step 1: Log into SSH console using your SFTP username and password.
Step 2: Create a MySQL backup using mysqldump command. Observer Grater Than Symbol.
>mysqldump -uusername -p databasename > newbackup.sql
Restore a MySQL backup in New Server using below command. Observe Less Than Symbol.
>mysqldump -uusername -p databasename < newbackup.sql
Step 3: Create a WordPress Site Files Backup from Old Server and Restore it in New Server. Site directory public_html may be different in different severs. It may be just html folder some times. Also, path to your directory may be different. If you have access to CPANEL, you can know the path by using File Manager. First create a Full Site Backup using the below command. It worked on Ubuntu Operating System.
>sudo tar -pczvf mybackup.tar.gz /var/www/public_html
Now, upload the created backup file in new server and Restore all the files to corresponding html or public_html directory.
>sudo tar -pxzvf mybackup.tar.gz -C /
You may need to edit wp-config.php file of new server with new database name, username and password.
Database Name Database Name used by WordPressDatabase Username Username used to access DatabaseDatabase Password Password used by Username to access DatabaseDatabase Host The hostname of your Database Server. A port number, Unix socket file path or pipe may be needed as well.
2. WordPress Migration Plugin
WordPress comes with many Migration or Transfer Plugins. Install a wordpress migration plugin of your choice in old hosting server. These plugins usually charge more than 50$. Some support unlimited number of migrations and sites while some support only single WordPress site.
Step 1: Take entire site backup containing both Files and Database. Download the backup file in to computer or a cloud storage like Google Drive or DropBox.
Step 2: Install WordPress in another or new server with default parameters. After installation is over, install the same Migration Plugin. Migration Plugins come with restore option. Upload the existing backup from computer or cloud storage. Once the process is complete, your new server contains your expected site data. You may have to cross check for any changes or abnormalities if any.
3. Using a Dedicated Target WordPress Plugin From Hosting Providers
Some hosting providers encourage WordPress site owners to migrate from any hosting server or Provider using dedicated plugins. Popular wordpress migration plugins are from SiteGround, CloudWays etc.
Dedicated WordPress migration plugins from Hosting Service Providers are more reliable than generalized All in One or Any Hosting Plugins. Hosting providers even offer free migration support if customer opts for certain plans. SiteGround Free migration plugin is some what popular for reliable migrations.
WordPress Migration or Transfer to Another Host Using JetPack Plugin with just 7$
It is not a direct transfer or migration of WordPress website from one hosting server to another. We played a direct trick using Backup and Restore feature of Jetpack plugin and ValutPress Site backup and security service offered by WordPress creators.
This process helps to migrate even Godaddy Managed WordPress site to any other hosting provider. Migrating from Godaddy is the most difficult migration we have seen till now. We go step by step to migrate an existing wordpress website.
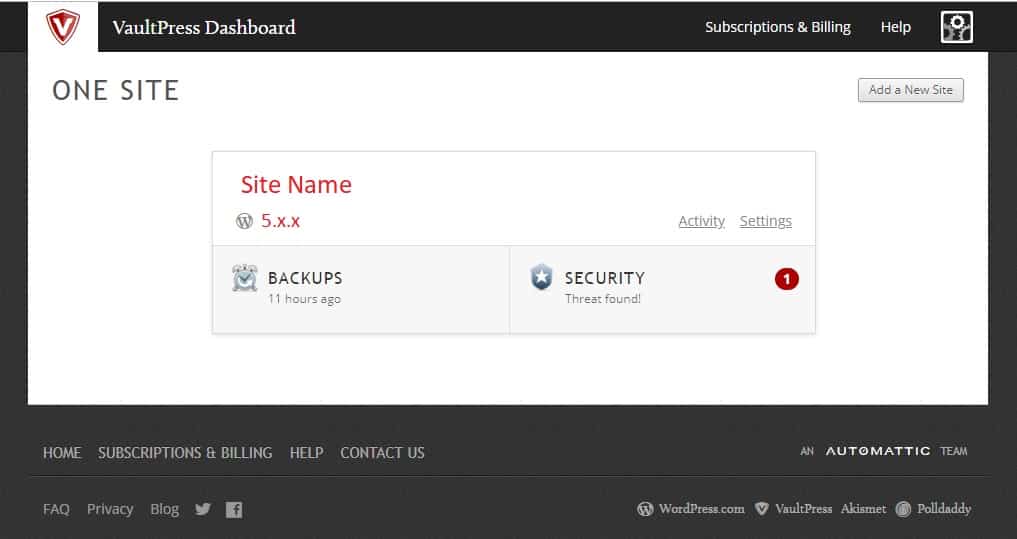
Step 1: Install JetPack plugin in your existing wordpress site. Subscribe to a Premium Plan for 1 month costing around 7$ or less. ValutPress is offered by JetPack for taking and restoring backups. Open ValutPress link from JetPack dashoard.
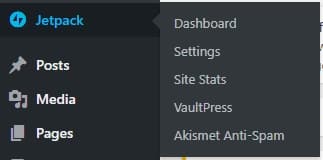
Step 2: Click on Settings to explore options like Backups, Security and Settings.
Step 3: Under Settings, provide a Site URL. Out of three options SSH (Secure Shell), SFTP (Secure FTP) and FTP (File Transfer Protocol), provide details for atleast one option. Provide IP address of site, Username and Password. Do not touch Alternate Option as of now. Once your WordPress site is connected, Backup Process starts. It takes hours to complete the backup process. Your patience is appreciated here.

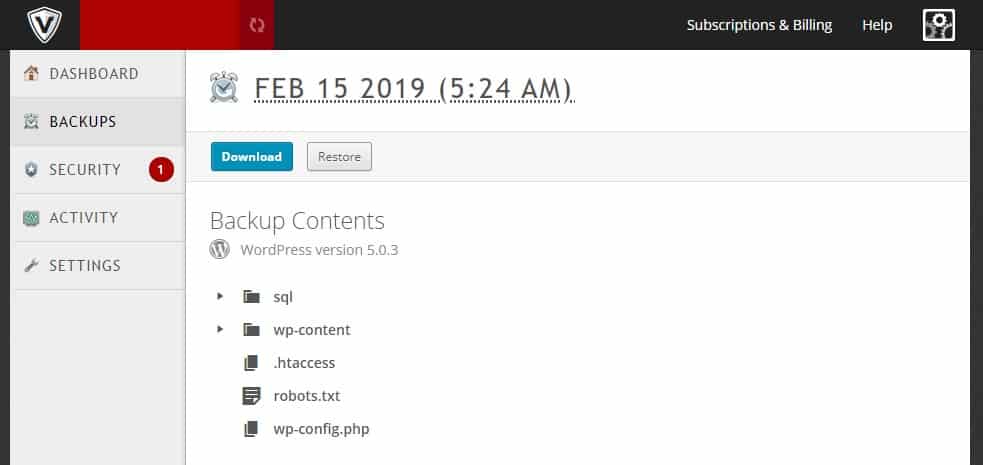
Step 4: Once backup is created, You can go to Backups option.
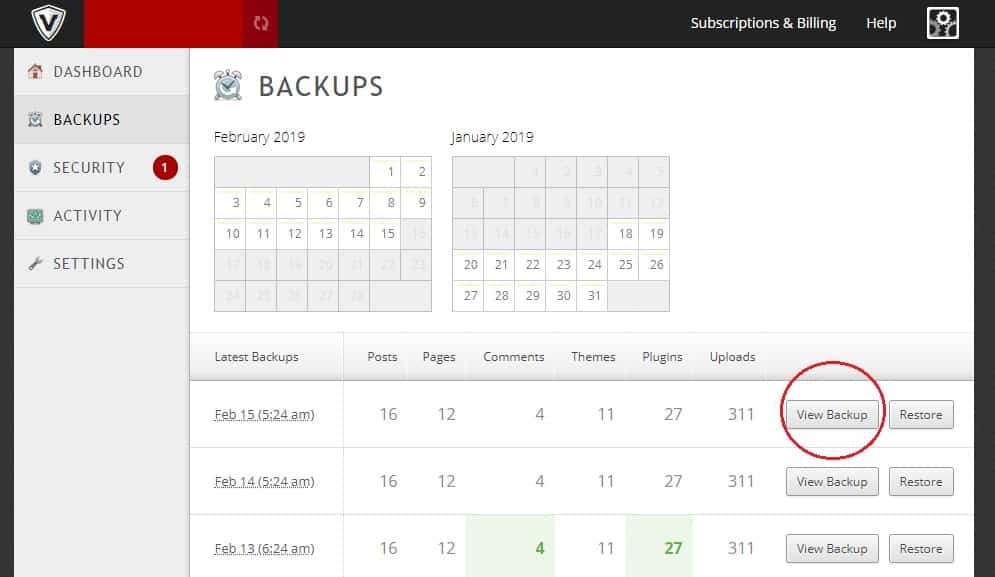
Step 5: Once the backup is created, you can go to Alternate option under Settings. Fill the details of Second Hosting Server to start Migration. It says “Restore your site to a new location by setting up this alternate connection”.
Step 6: If Step 5 does not work, You can Install a dummy wordpress site on new server. Connect the new server to VaultPress by feeding new SSH details like IP address, Username and Password. Now simply go to existing Backups and Click Restore. Your new server wordpress installation will be overwritten with original Old Site Files and Database. This process takes a lot of time say 3 to 10 hours. For very big sites, time required to complete migration is even more.
Migration of wordpress site is completed now. Now go to your Domain Provider and change DNS settings to point to new IP of your new Server. It takes time for DNS changes to get effected. Though domain providers say that DNS changes take up to 24 hours, it usually takes less than 1 hour.
Say Welcome to your Migrated WordPress site on new hosting server.
If you like this article, please share the article with your friends and colleagues to encourage authors. Thank You.
You can also read our article explaining how to add Google Analytics Tracking to wordpress site.